MongoDB Kubernetes OperatorでKubernetes上にMongoDBをデプロイする。 #MongoDB #Kubernetes #k8s

この記事は1年以上前に投稿されました。情報が古い可能性がありますので、ご注意ください。
本稿はMongoDB Kubernetes Operatorを使ってKubernetes上にMongoDBをデプロイしてみる記事です。
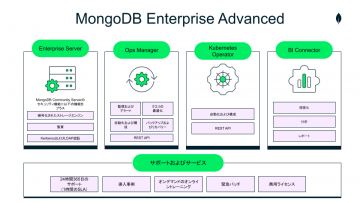
MongoDB Kubernetes Operatorについて
MongoDB Kubernetes OperatorはMongoDBをカスタムリソースとしてKubenetes上にデプロイする為のOperatorです。
MongoDBをKubernetes上にデプロイすることでKubernetesが提供する
高可用性、モニタリング、スケーリング、サービスディスカバリ等のメリットを受けることができます。
MongoDB Kubernetes Operator 公式ドキュメント:
https://docs.mongodb.com/kubernetes-operator/stable/
Community版のドキュメント:
https://github.com/mongodb/mongodb-kubernetes-operator/blob/master/README.md
MongoDB Kubernetes Operatorのコンポーネント
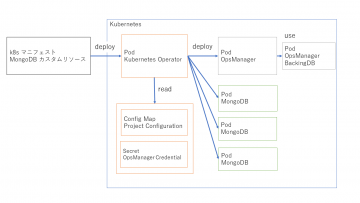
MongoDB カスタムリソース
MongoDBのカスタムリソースです。
Standalone,ReplicaSet,ShardedCluster等が定義されています。
Kubernetes Operator
MongoDBのカスタムリソースをデプロイする為のOperatorです。
OpsManager
デプロイされたMongoDBを管理するコンポーネントです。
OpsManagerが使用するMongoDB(BackingDB)も必要です。
Project Configuration
OpsManagerの管理単位である「プロジェクト」の設定をConfig Mapで作成します。
OpsManager Credential
OpsManagerに接続するためのキー情報をSecretで作成します。
MongoDB Kubernetes Operatorを使用したMongoDBのデプロイ手順
デプロイ手順は公式ドキュメントにあるクイックスタートを参考にします。
クイックスタートではOpsManagerがデプロイ済みであることが前提となっていますが
本稿ではOpsManagerのデプロイも手順内にて行います。
クイックスタート:
https://docs.mongodb.com/kubernetes-operator/stable/kind-quick-start/
Kubernetes環境の準備
今回はGKEを使用します。
ワーカーノードのスペックは以下の通りです。
- マシンタイプ:e2-custom-8-16384(CPU 8コア、メモリ 16GB)
- ストレージ:100GB
- ノード数:3
Kubernetes Operatorのgitリポジトリのクローン
Kubernetes Operatorのgitリポジトリをクローンします。
$ git clone https://github.com/mongodb/mongodb-enterprise-kubernetes.git
namespace作成
MongoDB用のnamespaceを作成します。
$ kubectl create namespace mongodb
$ kubectl config set-context $(kubectl config current-context) --namespace=mongodb
Kubernetes Operatorのデプロイ
リポジトリのクローンを作成したディレクトリに移動し
CRDの登録と、Kubernetes Operatorのデプロイを行います。
$ cd mongodb-enterprise-kubernetes
$ kubectl apply -f crds.yaml
$ kubectl apply -f mongodb-enterprise.yaml
Kubernetes Operatorがデプロイされていることを確認します。
$ kubectl get pods
NAME                                          READY   STATUS    RESTARTS   AGE
mongodb-enterprise-operator-8944b4f8c-89qwk   1/1     Running   0          81m
OpsManagerのデプロイ
サンプルのyamlファイルを使用します。
接続用のLoadBalancerが必要ですので、以下の様に追記します。
$ vi samples/ops-manager/ops-manager.yaml

---
apiVersion: mongodb.com/v1
kind: MongoDBOpsManager
metadata:
  name: ops-manager
spec:
  # the number of Ops Manager instances to run. Set to value bigger
  # than 1 to get high availability and upgrades without downtime
  replicas: 3

  # the version of Ops Manager distro to use
  version: 5.0.2

  # optional. Specify the custom cluster domain of the Kubernetes cluster if it's different from the default one ('cluster.local').
  # This affects the urls generated by the Operator.
  # This field is also used for Application Database url
  # clusterDomain: mycompany.net

  # the name of the secret containing admin user credentials.
  # Either remove the secret or change the password using Ops Manager UI after the Ops Manager
  # resource is created!
  adminCredentials: ops-manager-admin-secret

  # optional. The Ops Manager configuration. All the values must be of type string
  configuration:
    mms.fromEmailAddr: "admin@thecompany.com"

  # the application database backing Ops Manager. Replica Set is the only supported type
  # Application database has the SCRAM-SHA authentication mode always enabled
  applicationDatabase:
    members: 3
    version: 4.4.4-ent
    # optional. Allows to pass custom MongoDB process configuration
    additionalMongodConfig:
      operationProfiling:
        mode: slowOp
    podSpec:
      cpu: '0.25'
  ###### 以下2行を追記 #####
  externalConnectivity:
    type: LoadBalancer
OpsManagerをデプロイします。
$ kubectl apply -f samples/ops-manager/ops-manager.yaml
$ kubectl get pods
NAME                                          READY   STATUS    RESTARTS   AGE
mongodb-enterprise-operator-8944b4f8c-x5bzn   1/1     Running   0          43m
ops-manager-0                                 1/1     Running   0          12m
ops-manager-1                                 1/1     Running   0          7m28s
ops-manager-2                                 1/1     Running   0          4m42s
ops-manager-db-0                              2/2     Running   0          15m
ops-manager-db-1                              2/2     Running   0          14m
ops-manager-db-2                              2/2     Running   0          13m
Kubernetes OperatorとOpsManagerの連携
先程デプロイしたOpsManagerに接続します。
LoadBalancerがデプロイされているので、外部IPアドレスを確認します。
$ kubectl get service
NAME                  TYPE           CLUSTER-IP     EXTERNAL-IP    PORT(S)                          AGE
operator-webhook      ClusterIP      〇.〇.〇.〇     <none>         443/TCP                          89m
ops-manager-db-svc    ClusterIP      None           <none>         27017/TCP                        89m
ops-manager-svc       ClusterIP      None           <none>         8080/TCP                         85m
ops-manager-svc-ext   LoadBalancer   〇.〇.〇.〇     ×.×.×.×        8080:30201/TCP,25999:32027/TCP   85m
確認したIPアドレスでOpsManagerに接続します。
http://×.×.×.×:8080
OpsManagerに接続すると、まずログイン画面が表示されます。
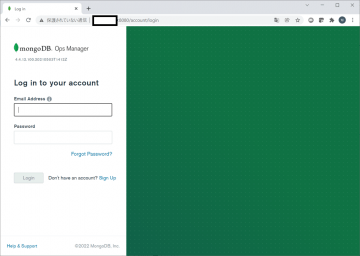
「Sign Up」からユーザを作成します。
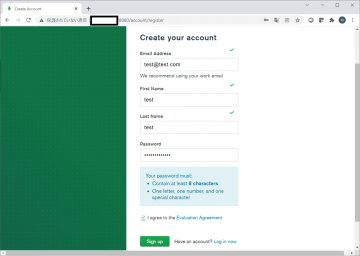
初回ログイン時には、初期設定の画面が表示されます。
設定項目について今回は割愛させて頂きます。
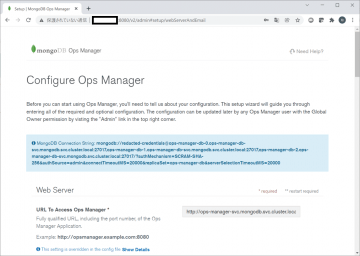
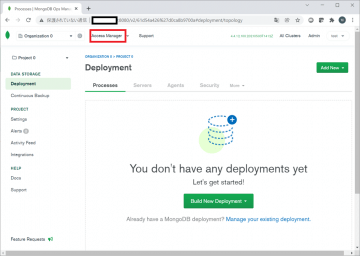
APIキーを発行します。
画面上部の「Access Manager」を選択します。
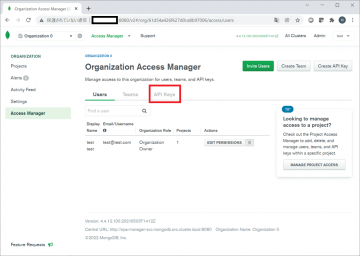
続いて、「API key」を選択します。
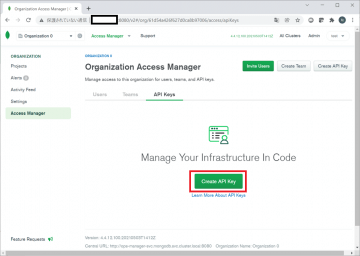
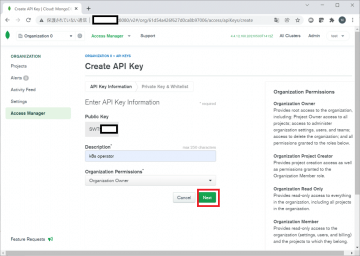
「Create API Key」ボタンを押下します。
表示されているPublic Keyをメモしておきます。
「Organization Permissions」で権限を設定します。
権限は「Organization Owner」を選択します。設定後に「Next」を押下します。
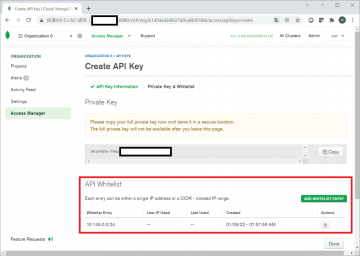
Private Keyをメモしておきます。
また、「API Whitelist」を設定する必要があります。kubernetes operatorからの接続を許可する為
ノードのアドレス範囲を設定してください。
OpsManagerのAPIキーを元にsecretを作成します。
"user"にAPIキーのPublic Keyを"publicApiKey"にPrivate Keyを設定します。
kubectl -n mongodb \
  create secret generic ops-manager-admin-key \
  --from-literal="user=XXXXXX" \
  --from-literal="publicApiKey=xxxxxxxxx-xxxx-xxxx-xxxx-xxxxxxxxxxx"
OpsManagerのOrgIDを元にconfigmapを作成します。
BaseUrlはOpsManagerのIPアドレスを設定してください。
OrgIDは左上の歯車マークから確認することができます。
kubectl create configmap myconfigmap \
  --from-literal="baseUrl=http://×.×.×.×:8080" \
  --from-literal="orgId=xxxxxxxxxxxxxxxxxxxxxx"
レプリカセット(MongoDB)のデプロイ
MongoDBをデプロイします。
今回はメンバー数が3のレプリカセット構成となります。
cat <<EOF | kubectl apply -f -
apiVersion: mongodb.com/v1
kind: MongoDB
metadata:
  name: demo-mongodb-cluster-1
  namespace: mongodb
spec:
  members: 3
  version: 4.4.5-ent
  type: ReplicaSet
  authentication:
    enabled: true
    modes: ["SHA"]
  opsManager:
    configMapRef:
      name: myconfigmap
  credentials: ops-manager-admin-key
  persistent: true
  podSpec:
    podTemplate:
      spec:
        containers:
        - name: mongodb-enterprise-database
          resources:
            limits:
              cpu: 2
              memory: 1.5G
            requests:
              cpu: 1
              memory: 1G
            persistence:
              single:
                storage: 10Gi
EOF
podがデプロイされていることを確認します。
デプロイがうまくいかない場合は、OpsManagerのAPIキーやOrgID等を確認してください。
$ kubectl get pods
NAME                                          READY   STATUS    RESTARTS   AGE
demo-mongodb-cluster-1-0                      1/1     Running   0          10m
demo-mongodb-cluster-1-1                      1/1     Running   0          9m43s
demo-mongodb-cluster-1-2                      1/1     Running   0          9m2s
mongodb-enterprise-operator-8944b4f8c-89qwk   1/1     Running   0          164m
ops-manager-0                                 1/1     Running   0          160m
ops-manager-1                                 1/1     Running   0          154m
ops-manager-2                                 1/1     Running   0          151m
ops-manager-db-0                              2/2     Running   0          164m
ops-manager-db-1                              2/2     Running   0          163m
ops-manager-db-2                              2/2     Running   0          161m
MongoDBへ接続
OpsManagerからMongoDB接続用のコマンドを取得できます。
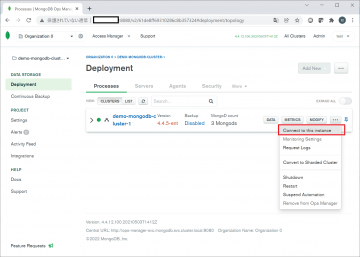
取得したコマンド
/var/lib/mongodb-mms-automation/mongodb-linux-x86_64-4.4.5-ent/bin/mongo --host demo-mongodb-cluster-1-0.demo-mongodb-cluster-1-svc.mongodb.svc.cluster.local --port 27017
デプロイしたMongoDBのpodにログインします。
$ kubectl exec -it demo-mongodb-cluster-1-0 /bin/bash
MongoDBログインコマンドを実行して、ログインします。
$ /var/lib/mongodb-mms-automation/mongodb-linux-x86_64-4.4.5-ent/bin/mongo --host demo-mongodb-cluster-1-0.demo-mongodb-cluster-1-svc.mongodb.svc.cluster.local --port 27017
MongoDB shell version v4.4.5
connecting to: mongodb://demo-mongodb-cluster-1-0.demo-mongodb-cluster-1-svc.mongodb.svc.cluster.local:27017/?compressors=disabled&gssapiServiceName=mongodb
Implicit session: session { "id" : UUID("8fd09e8b-fbb5-41d0-a821-ef8390e57bfa") }
MongoDB server version: 4.4.5
Welcome to the MongoDB shell.
For interactive help, type "help".
For more comprehensive documentation, see
        https://docs.mongodb.com/
Questions? Try the MongoDB Developer Community Forums
        https://community.mongodb.com
---
The server generated these startup warnings when booting:
        2022-01-12T08:25:05.540+00:00: Using the XFS filesystem is strongly recommended with the WiredTiger storage engine. See http://dochub.mongodb.org/core/prodnotes-filesystem
        2022-01-12T08:25:06.263+00:00: Access control is not enabled for the database. Read and write access to data and configuration is unrestricted
---
MongoDB Enterprise demo-mongodb-cluster-1:PRIMARY>
Kubernetes Operatorのデプロイ手順は以上です。
まとめ
Kubernetes Operatorを利用することでお手軽にMongoDBをデプロイすることができます。
今回はレプリカセットの構成でデプロイしましたが、スタンドアロンやシャーディング構成も対応しています。
KubernetesとMongoDBをご利用中であれば、導入を検討してみてはいかかがでしょうか。


